How to...?
CONNECT...
If you couldn't find the information you were looking for within our knowledge base...
Ask us a question
Action events
Events required, colour coded to quickly show status
Live Dashboard
Provides LIVE information for the most important events
Notifications
Receive updates when new routes are offered
Carrier detail
Current carrier and service level
Live Routes
Any new route offered will show here until invoice approval
Parcel tracking ID
Print a label, get a tracker for INFORM
Change carrier
Select a different carrier and / or service level
Label printing
Print individual as well as consolidated labels
Dispatching
Manual dispatch
Manifest
Click on the Route to view the manifest
CONNECT dashboard functionality
Multiple customers, same process, all in one place...
Accept the offer, do the job, provide the POD and upload the invoice...
We just want to help you get paid as quickly as possible!

CONNECT provides the visibility and status of each route you have accepted from the offer through to the approved invoice.
The CONNECT assistant : AMI, keeps track of each of your routes and lets you know what needs to be done next, guiding you through the process until the invoice is approved, from updating an action status based on the Accounts requirements to informing you of failed POD's, cost adjustments...
Video
Introduction to CONNECT
What does CONNECT actually do for you?
CONNECT has been designed to ease the burden of administration
It's simple really, you get offered a job, you do it and you want to be paid asap...
But nothing worthwhile is ever simple is it...?
To get paid you need to prove you did it, after all, the customer is paying for proof of delivery.
You will get:
-
an offer of a job
-
a delivery confirmation requirement
-
a proof of delivery requirement
-
an invoice requirement
So how does CONNECT help with that?
Rollover the below to see each section of CONNECT
LIVE routes
These are all the routes currently LIVE. They will remain in LIVE routes until the invoice they are associated to has been approved. They are then removed.
Actions
Each action represents a part in the process required to get an invoice approved. As each action is completed, the CONNECT assistant will update the status from blue [needs attention] to green [complete].
Dashboard KPI's
Your CONNECT assistant provides instant updates on the main actions. When the Dashboard status is updated, you know an action needs attending to. Select the KPI to view the action required.
1. LIVE routes
These are all the routes currently LIVE. They will remain in LIVE routes until the invoice they are associated to has been approved. They are then removed.
All your Accounts will show together, though you can configure this.
Click on the Route ID to get a Manifest.
2. Actions
Each action represents a part in the process required to get an invoice approved. As each action is completed, the CONNECT assistant will update the status from blue [needs attention] to green [complete].
-
ALLOCATE
This is the point of job offer. Setup your notifications in your profile and your CONNECT assistant will let you know when a job offer is made.
The Dashboard will also indicate all new job offers made.
Once received the status will be BLUE, click in the status to view the details, allocate a collection time and accept or reject the offer.
Depending on the Account requirement, you will be required to select a collection time from the DOCK. Your CONNECT Assistant will update each DOCK for you when you select a job, so you don't need to worry about incorrect allocation
Once accepted, Connect will update the status to GREEN, though you can click again to update a collection time as required.
Guide to ALLOCATE is here
-
DOCK status
coming soon....
-
Tracking
This is an important status as to be able to proceed to cost approval and invoicing, we need to know you have delivered it.
If you have integrated your tracking you need do nothing here. Once we have received a delivery confirmation, tracking is updated and the action is passed.
If you manually confirm, then the status will be red until all deliveries are confirmed.
It is important these are action as near to actual as possible and we save the user detail, date and time for each one.
Guide to upload is here
-
Proof of delivery
This status depends on the Account you are working for.
Some require 100%, so only if they ask you for it.
The CONNECT assistant will configure this for you automatically, including notifications if on request only.
You can upload POD's in 2 ways. Through CONNECT, rename them by the DESPATCH NOTE number and upload by dragging on multi and CONNECT will let you know there and then if any issues or integrate with us.

As POD's are uploaded to CONNECT you can see missing verses received. We also provide a KPI to show the % of outstanding POD's

To upload a POD you can click on the individual Route status button in blue or the KPI in the Dashboard. Click on the correct Account upload circle...

The Account will see your uploads as soon as they are confirmed to you.

As POD's are uploaded to CONNECT you can see missing verses received. We also provide a KPI to show the % of outstanding POD's
-
Invoice
This status is for the Route. There are 5 different status's for Invoice
- ADD - You need to agree the Route cost or add a cost addition
- APPROVED - You have agreed the Route cost
- RE-AGREE - You added a cost addition and the Account owner has agreed it. Click to agree
- UPLOAD - The invoice that includes this Route is ready for you to upload an invoice for
- PENDING - The invoice has been uploaded and is waiting for the Account to ation it
- REJECTED - The invoice you uploaded has been rejected by the Account owner. Click to see why...
These status's help you to follow the progress of a Route through the invoice process.
When an invoice has been approved for payment by the Account owner you will receive a notification and the routes associated to the invoice will be removed from your CONNECT Dashboard.
As an example, the basic process of events would be:
- ADD
- APPROVED
- UPLOAD
- PENDING
3. Dashboard KPI's
Provides instant updates on the main actions. When the Dashboard status is updated, you know an action needs attending to. Select the KPI to view the action required.
Your CONNECT assistant updates you on the following:
- Offered Jobs
- Cost addition decisions
- Invoices
- Outstanding POD's
-
Offered Jobs
Triggered each time a new job is offered. You can selected from the Action or click here to Allocate multiple jobs at once.
Any job that appears in this section will also show in the LIVE Routes section.
You can also create a custom download of the data so that you import into your own software
-
Cost addition decisions
During the invoice process you can request cost additions to the main rate card.
These cost addition requests must be confirmed by the Account.
If the are accepted the cost will be updated on the invoice, if the are rejected they will show here, as they require action so as to not hold up the invoice.
-
Invoices
At the end of an invoice period (for example a week) and when all the jobs with a collection date that falls within the week have been agreed, your CONNECT assistant will confirm the total cost, calculate any fuel surcharge and update this KPI to let you know to upload.
There is no window to complete this, but the Account cannot pay you until they have received.
If the invoice is rejected for any reason, this KPI will update to inform you. Click it to see the issue, correct and upload again.
Once successful, the associated jobs will be removed from the LIVE Routes section.
-
Outstanding POD's
Each time a delivery is made a POD is received. Rename with the Despatch Note number to prove you did it [its the match that tells your CONNECT assistant the job was done] and upload. They are automatically taken off the balance, a user, date and time stamp added and any upload issues are immediately shown to you on the upload page.
This KPI tells you the amount missing, as you did the job you should know what you need to upload
4. Notifications
Stay informed...
You can activate notifications to inform you when a new offer has been made.... or a cancellation
Select how you want to receive notifications
Guide to upload is here
Just tell me what i need to do?
1. Accept the job offer
Accounts you work for will offer you jobs. These will update automatically in your CONNECT and you will be sent notifications.
Select the job ID to see the manifest detail
Select the offered job to accept / reject and allocate a preferred collection time.
The account will be advised of your accepting or rejecting their offer.
Once allocated correctly the status will change from blue to green


When you receive an offer you need to either accept it or reject it. You can do this by the route or all at once

The allocate screen will show offered routes. Click on the accept status

The route collection time will update, the customer will see the change in DOCK and you can move on. You can do this anytime by selecting the Route from the Home page by clicking on the Allocate status button and following the instructions on the previous slide

When you receive an offer you need to either accept it or reject it. You can do this by the route or all at once
Video
Selecting a route collection time in CONNECT
What happens if the Route already has a pickup time?
Why can't I select the collection slot that i want?
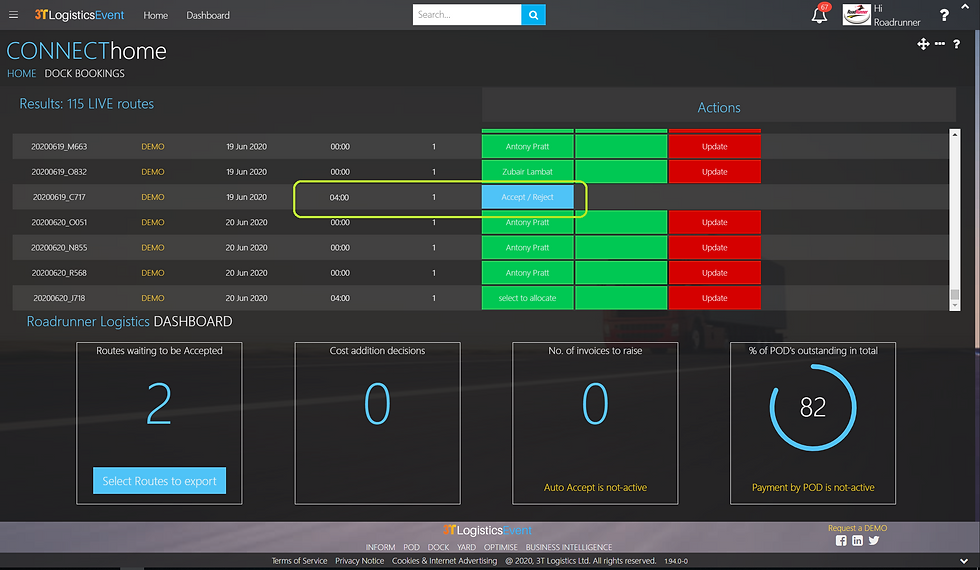
The offered route will already have a pickup time. This means that the planners have already allocated one for you.

This will be done in situations where the product has a manufacturing time. You will not be able to change the time, only Accept the offered job.
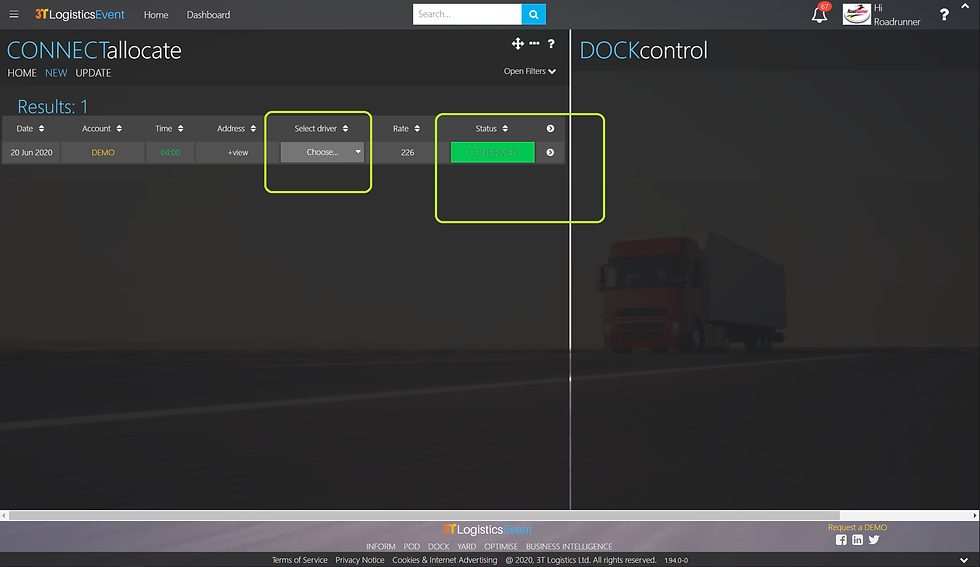
Click accept and allocate a driver as required if using INCAB. Click HOME to go back to your Dashboard.

The offered route will already have a pickup time. This means that the planners have already allocated one for you.
Video
Accepting a route with a pre-determined collection date and time
How to refuse a route offer
Delivery manifest
You can print out a manifest from CONNECT by clicking on thee Route number in the results section.
The manifest is the same one that the customer has available and can give to the driver when despatching the vehicle.
It has the main information and now includes a QR code that will show the route in Google maps.
The driver simply needs to open their camera or download a QR code reader app and scan the code.


Document visibility
A customer can add documents for the delivery.
To view them see below
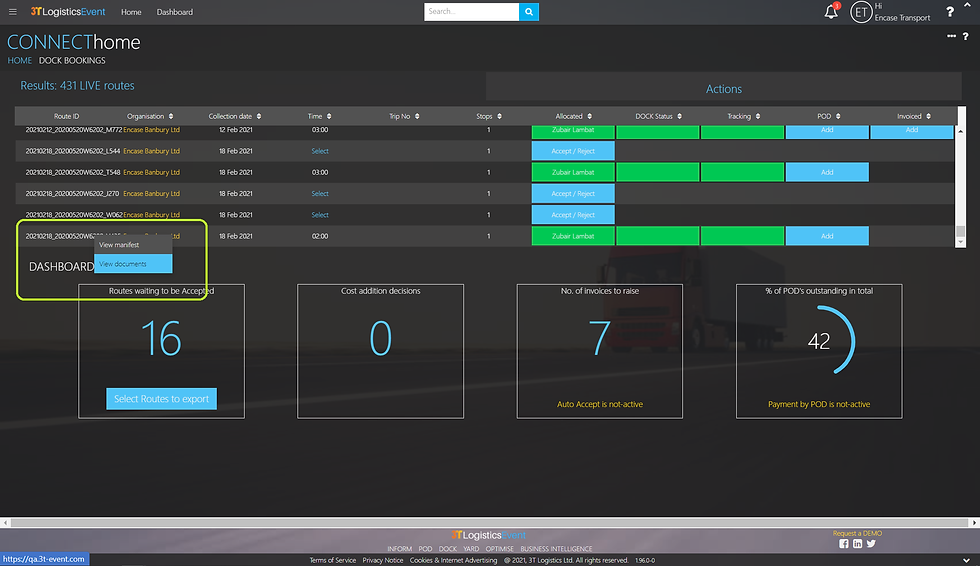
Click on the Route number to get the option to view manifest or documents


Click on the Route number to get the option to view manifest or documents
Download your routes
So you can use CONNECT to accept jobs but you really dont want to have to manually type all that information into your own transport planning system.
You can create your own custom export file, configured with the data you want, in the order you want and in the format that you want.
Export from us and import into you...
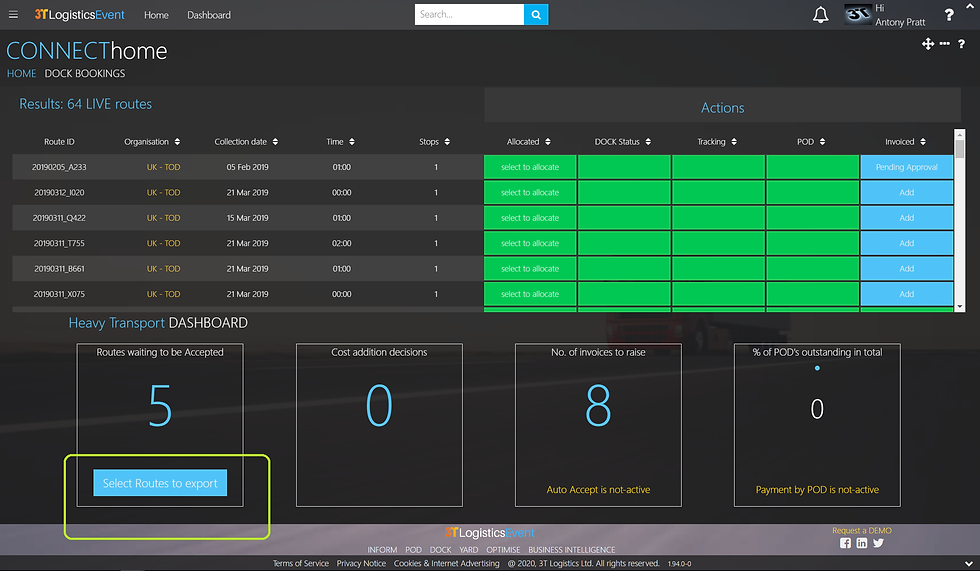
Click on export button

The export button will activate the ability to select routes. Tick the boxes to select your routes, the click the button again to export.

Use the configuration '...' top right, to select the information you need, in the order you need and in the format you need

Click on export button
2. DOCK status
...coming soon
3. Confirm delivery
You will be required to confirm the delivery before you can access POD or invoice
If you have integrated your LIVE tracking with CONNECT this will be automatic
If you have no LIVE tracking you will be required to do this through CONNECT
Simply confirm the date and time, but beware we date and time stamp each confirmation

Select the the correct Stop, add correct date and time, this is set by default to current], delivery status and Update.
This is required for each Stop for tracking.

Video
How to add manual tracking updates
4. Proof of delivery
This status will activate once all Stops on the delivery have been confirmed.
Select the status in blue or alternatively you can click on the POD Dashboard widget showing your current outstanding POD's and upload.
You can decide to upload POD's either by:
-
dragging multiple images into the correct Account's POD bucket
-
providing a file of images
Some Accounts you work for will require 100% returned POD's, some will base it on return only if requested by the Account and some on actual Payment by POD.
You will be told the required during the tender process.
Upload is by DESPATCH NOTE NUMBER. This can be found on the POD.
You need to rename the POD image with this exact number
If, during upload we cannot match it to the Account we will fail immediately and tell you why.
If the POD has multiple pages use '_1' for 1 additional page and '_2' for a 2nd additional page.
Are you using Events smartphone app?
To get around the problems of renaming, uploading and hitting 100% returns of POD's, you could use the 3T integrated smartphone application to automatically take care of all of that for you...
available now....

The CONNECTED Freight APP - INCAB mobile
Manual POD upload
To upload POD's there are 2 options:
-
Rename the PODS to match the Despatch Note number and bulk upload
-
Upload POD's individually without renaming them
Below is the process to upload individual PODs without the need to rename them.

To upload a POD without renaming it, select the route and click on the POD button...

A route can have multiple Stops (deliveries), so multiple PODs. Select the correct Stop to upload the POD against...

The button is now green so all the PODs for each Stop are uploaded

To upload a POD without renaming it, select the route and click on the POD button...
Manual upload of a POD
Manual entry orders:
-
No POD reference added to the order
-
The POD button will show as green as Event does not expect a POD as no reference for one but you can add a POD to the Stop still
-
-
POD reference added to the order
-
The POD button will show as blue as Event is expecting a POD.
-
Integration orders:
-
No POD reference supplied
-
The POD button will show as green as Event does not expect a POD as no reference for one but you can add a POD to the Stop still
-
-
Despatch note number supplied
-
The POD button will show as blue as Event is expecting a POD.
-
Video
Uploading manual POD's
5. Invoice
An invoice is created on the confirmation of delivery for the 1st route of a new week.
After that, any additional route is added to this invoice.
At this stage the invoice is OPEN and each new route that is added will need to be AGREED by you and APPROVED by the Account where a cost adjustment is requested.
-
Agreeing route prices
Each job you deliver will need to be agreed.

Click on the status 'ADD' button for Invoicing to action the route

The Route cost is displayed and if correct you can click the AGREE button. It will change to ACTIONED! once updated.

On a multi drop route, the most expensive tariff is always used as the main route rate. The additional rates will show the Stop charges.

Click on the status 'ADD' button for Invoicing to action the route
-
Adding Route / Stop cost additions
It may be necessary for you to add a cost addition to a Route or a Stop. For example, a demurage charge.
You can do this at anytime until the Route Invoiced status says 'UPLOAD'.
Any cost addition added will be put in front of the customer to agree, so the more information you can add to the cost addition reason the better.
A cost addition can either be rejected, disputed or agreed.
If agreed, the Invoiced status button for the Route will show as . Select and agree.
If rejected, you will be notified specifically in the widget in your Dashboard called 'Cost addition decisions'. The Route Invoice Status will also turn ORANGE and show as 'Re- agree'.
Now you can agree the rejection or add again with additional information.
A dispute will require further information from you. This is now a manual process outside of CONNECT.

Select a route to action the cost

The route is visible. Click on the right to view the Stops to add a cost addition and on the left to add a Route cost addition

The customer should leave a reason for the rejection. The reason and costs will be RED. The '?' helps inform you how to proceed. Select RE-AGREE to accept decision.

Select a route to action the cost
Video
Costs and invoicing
Requesting additional costs
Cancelled routes / Stops - how does that work?
So what happens in situations where you accept the offer of a job and then it gets cancelled?
If the Route or Stop has been ACCEPTED by you and the Account cancels it 12 hrs before the collection date and time of the route, then we will leave the Route / Stop visible for you to update with a cancellation cost addition.
-
Upload an Invoice
You will be informed when an invoice is ready to be uploaded as the 'No. of invoices to upload' widget in the Dashboard will increase in number.
The invoice created will include the total agreed route costs, including cost addition and any calculated fuel surcharge costs
It will only be approved for upload once all route costs for the collection week are agreed
When the invoice is created, any additional route added to it will create a separate invoice, identified by an _1 added to the invoice number
Once uploaded, the customer will action it. If approved you will receive a notification of receipt.
If rejected for any reason you will be informed why and asked to amend and resubmit.
What should you call your invoice?
Your invoice should be named as below
-
your invoice reference you use on your invoice.
This will be unique

This widget will tell you when you have an invoice to agree
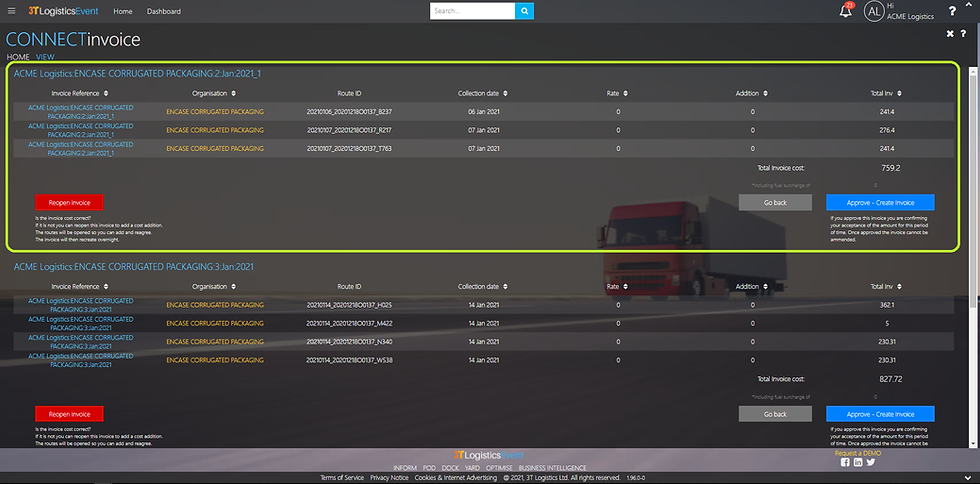
Click on the widget to see the pre invoice detail
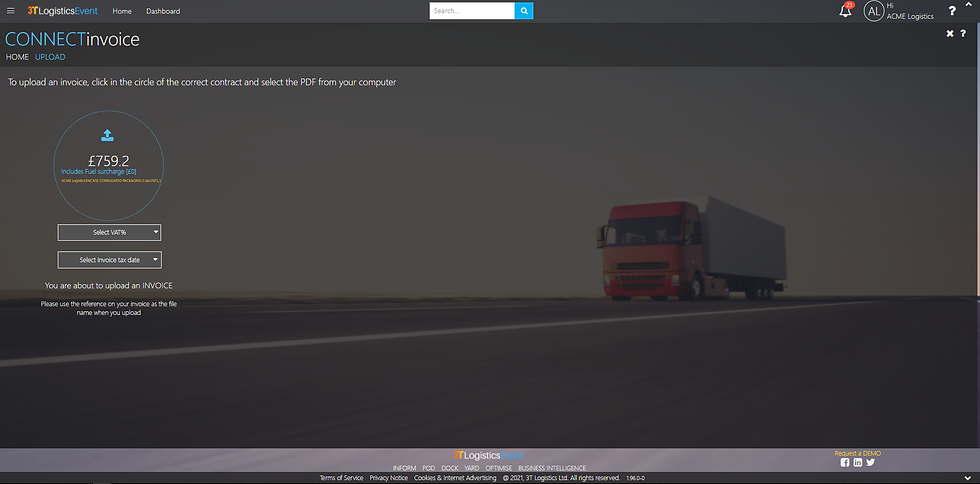
Now create your invoice on headed paper for the amount you agreed. We show it again here for you and the fuel breakdown. Add VAT and Tax date

This widget will tell you when you have an invoice to agree
-
Fuel surcharge
If you have subscribed to fuel surcharge, the calculated total will show on the invoice upload. If you roll over the total it will show you the breakdown and how it was calculated.
See more here

Credit Notes

Credit Notes are acessed through the INVOICE widget

Select the credit note menu option

Once the credit note has been accepted by the customer it will be updated to Approved

Credit Notes are acessed through the INVOICE widget
Available trucks
When you agree a contract with an Account, this usually includes a rate card and some availability per region per truck type per day.
Your CONNECT account gives you the ability to update this contracted allocation to benefit from additional work when you have spare capacity
We call this:
Dynamic Availability
For more information click here

Keeping you mobile...
Helping to keep you relevant...
Video
How to use INCAB

